
If you’ve been craving a little holiday magic without the stress of turning your oven on (because honestly, who has time for that during December?), this No Bake Grinch Pie is about to become your new festive bestie. Bright green, creamy, and sprinkled with adorable red hearts, it captures all the fun of the season—without any fuss. And yes, the primary keyword makes its grand entrance right here, just as promised.
Whether you’re juggling work, wrangling kids, or simply trying to keep your sanity in the whirlwind of holiday prep, this recipe is your shortcut to bringing a smile to everyone at the table. It’s quick, joyful, and just quirky enough to make even the Grinch crack a grin.
Table of Contents
Why You’ll Love This No Bake Grinch Pie
This dessert checks every box for busy home cooks—especially my fellow women out there balancing fifty tabs in real life and three devices at once. Here’s why it’ll become your new go-to:
- Zero oven time. Truly no bake. Not “technically no bake if you count the crust.” Nope—this one is blissfully oven-free.
- Family-friendly flavor. If your kids love pudding, Oreos, and anything neon green, this is a guaranteed win.
- Easy ingredients. No specialty items, no wild goose chases at the store.
- Perfect for parties. It looks like you spent hours on it. You absolutely did not.
Ingredients You’ll Need
- 1 Oreo pie crust
- 1 box white chocolate pudding (3.9 oz)
- 2 cups cold 2% milk
- ½ container Cool Whip
- 2–3 drops neon green gel food coloring
- 1–2 drops regular green food coloring
- ½ cup green sanding sugar
- ½ cup mini red heart sprinkles
- ½ cup large red heart sprinkles
How to Make This Grinch Pie (Step-by-Step)
Let’s break this down into a smooth, doable process—something even a tired holiday warrior can handle without breaking a sweat.
1. Mix the Magic
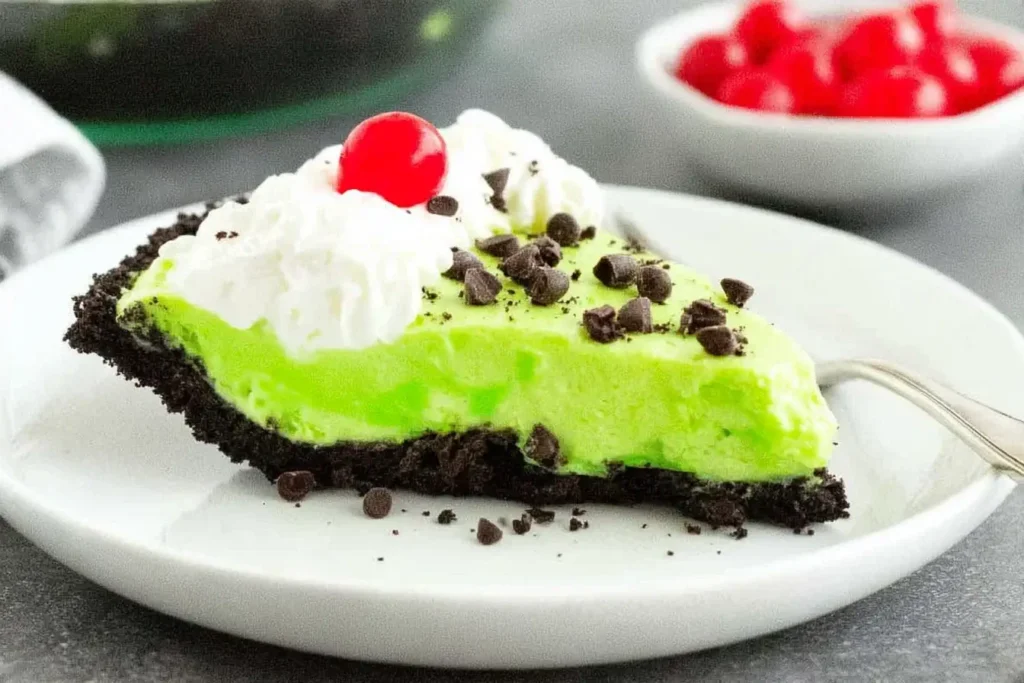
In a large mixing bowl, whisk together the pudding mix, cold milk, and both green food colorings. Keep whisking until the pudding thickens and forms soft peaks. It should look like the exact shade of the Grinch’s “I’m not mad, just disappointed” facial expression.
2. Fill the Crust
Scoop the pudding mixture into your Oreo crust and spread it out evenly. Take a second to admire that color—holiday joy in pie form.
3. Chill Out
Refrigerate your pie for at least 3 hours. This is the hardest part, especially if you have small humans circling the fridge like hungry elves.
4. Add the Fluff
Once the pie is set, top the entire surface with Cool Whip. Think of this as the snowy Mount Crumpit vibe.
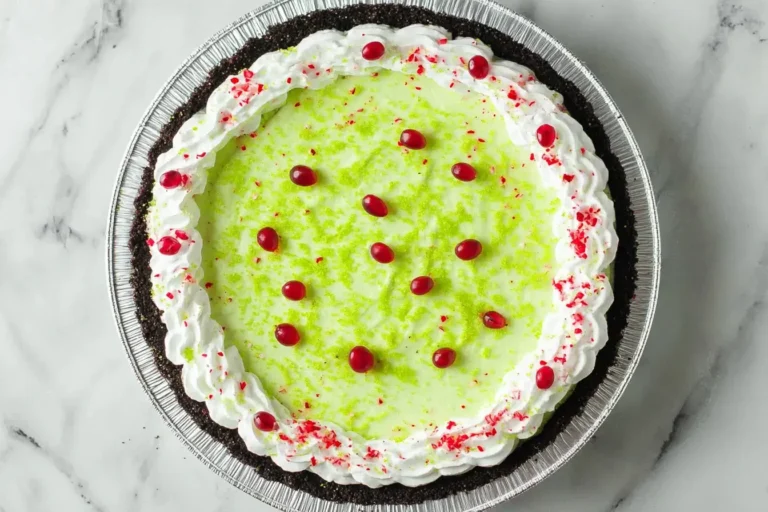
5. Sprinkle the Spirit
Now for the fun part: shower your pie with green sanding sugar and mini red heart sprinkles. The more whimsical, the better.
6. The Big Heart Moment
Right before serving, place a single large red heart sprinkle on each slice. This is where the transformation happens—in true Grinch style, hearts grow three sizes.
7. Serve and Enjoy
Dish it up, make your guests smile, and bask in the compliments you’ll inevitably receive.
My Little Grinch Pie Story
This No Bake Grinch Pie became a holiday staple at my house after I brought it to a family gathering. My niece, who’s usually skeptical of anything that isn’t mac and cheese, pointed to the neon green filling and said, “Is that slime? Can I eat it?”
She not only ate it—she asked for seconds. That’s when I knew this recipe was Chicken Magic–approved and ready for all of you.
Helpful Tips for the Perfect Grinch Pie
- Keep the milk cold. Warm milk won’t set the pudding right—and nobody wants soupy Grinch.
- Gel food coloring works best. It gives that vibrant holiday green without thinning the pudding.
- Don’t skip the chilling time. I know, I know. But patience is part of the pie’s charm.
- Decorate just before serving. It keeps the sprinkles bright and the hearts crisp.
And hey, if your Cool Whip looks a little lumpy? Don’t stress. That’s just more holiday personality.
FAQs About Making Grinch Pie
Can I use a different crust for this Grinch Pie?
Absolutely! While the Oreo crust pairs perfectly, you can swap in graham cracker or even a chocolate cookie crust if you prefer.
Can I make this Grinch Pie ahead of time?
Yes! Prep it the night before and keep it refrigerated. Just wait to add the sprinkles until serving time so they stay crisp.
Can I double this recipe for a party?
You sure can. Just grab two crusts and double the filling—this dessert goes fast.
How do I store leftovers?
Cover the pie loosely with plastic wrap and keep it in the fridge for up to 3 days.
Ready to Bring This No Bake Grinch Pie Into Your Holiday Kitchen?
This No Bake Grinch Pie is your ticket to a stress-free, fun, and festive dessert that truly feels like a little holiday hug on a plate. It’s bright, sweet, and playful—just the kind of treat that makes the season feel a little warmer (even if the Grinch would never admit it).
If you try it, I’d love to hear how it turned out. Share your creations, add your spin, and let’s keep the Chicken Magic community cooking with joy. Happy holidays—and happy feasting!
More Festive Treats You’ll Love
If this No Bake Grinch Pie has you feeling all warm, jolly, and ready to sprinkle a little extra magic into your holiday season, here are a few more delightful recipes your family will adore. These treats pair perfectly with cozy nights, Christmas movies, and that second (or third) slice of pie:
- For an extra touch of Grinch-y fun, whip up a mug of Grinch Hot Chocolate — it’s the perfect cozy companion to your dessert.
- If you’re in the mood for another easy, no-bake crowd-pleaser, try the creamy, dreamy No Bake Christmas Cookie Lush.
- Hosting friends or planning a holiday snack board? Add a pop of festive color with these chewy, fun Christmas Rice Crispy Treats.
- And for something beautifully swirled and just a little whimsical, don’t miss these Twisted Christmas Cookies—they’re guaranteed to bring smiles.
Feel free to explore and make your holiday table even more magical. Your kitchen is about to become the sweetest place in the house!
Print
Grinch Pie
- Total Time: 10 minutes
- Yield: 1 pie ( 8 slices) 1x
Description
This No Bake Grinch Pie is a fun, festive, and incredibly easy holiday dessert made with a creamy green pudding filling, Oreo crust, whipped topping, and cheerful red heart decorations. Perfect for Christmas parties, family gatherings, or a quick make-ahead treat everyone will love.
Ingredients
-
1 Oreo pie crust
-
1 box white chocolate pudding (3.9 oz)
-
2 cups cold 2% milk
-
½ container Cool Whip
-
2–3 drops neon green gel food coloring
-
1–2 drops green food coloring
-
½ cup green sanding sugar
-
½ cup mini red heart sprinkles
-
½ cup large red heart sprinkles
Instructions
-
Prepare the pudding according to the package directions by whisking the pudding mix, cold milk, and both green food colorings together until it thickens and forms soft peaks.
-
Scoop the green pudding mixture into the Oreo crust and spread evenly.
-
Refrigerate for 3 hours to allow the pie to fully set.
-
Remove from the fridge and top with Cool Whip.
-
Sprinkle with green sanding sugar and mini red heart sprinkles.
-
Before serving, add one large red heart sprinkle on each slice.
-
Slice, serve, and enjoy this festive Grinch-inspired dessert!
Notes
-
Make sure the milk is very cold to help the pudding set properly.
-
Add more or fewer drops of food coloring to achieve your desired shade of Grinch-green.
-
Add the large decorative hearts just before serving for the best presentation.
- Prep Time: 10 minutes
- Cook Time: 0 minutes
- Category: Dessert
- Method: No Bake
- Cuisine: American
Nutrition
- Serving Size: 1 slice
- Calories: 285 kcal
- Sugar: 28 g
- Sodium: 260 mg
- Fat: 12 g
- Saturated Fat: 6 g
- Unsaturated Fat: 5 g
- Trans Fat: 0 g
- Carbohydrates: 40 g
- Fiber: 1 g
- Protein: 3 g
- Cholesterol: 5 mg